Thursday, June 30, 2011

4th of July Sale!!

Welcome to one of the BIGGEST sales of the year!! The ‘Let Freedom Thrive’ Shelf Reliance 4th of July Sale! Hurry this sale will only continue until July 5th!!

There are 2 ways to save! You can order online and get great saving like these, OR you can contact me directly and get PARTY PRICING!! (If you are a QClub Member, you will automatically get Party Pricing)
So, go online and order, or contact me today and I will send you the Party Pricing only deals!
Hurry Sale Ends July 5th!


It's easy to keep up with the great sales and recipes! Just subscribe to stay up to date!

Tuesday, June 28, 2011

Our Daily Starch?!?!

 Bread. For many generations, bread has been an essential to life for man kind. It was *the* stable of every culture. Bread was healthy. Bread was life sustaining. But now, it seems, bread just makes you fat.


Most likely you can peek at the label of one of your favorite treats and you will see 'enriched wheat flour' as a main ingredient. But what IS enriched wheat flour?

Enriched wheat flour is flour that has been bleached and striped of all nutrients until it forms a nutrition-less starch. Enriching is necessary because the processing used to make white flour destroys most of the nutrients that originally were present in the whole grain. 

Interestingly, One of the key nutrients added back to white flour is iron, however it is not iron in a usable form, but yet a metallic form our bodies cant process.

White flour is essentially nothing more than a starch, and the body processes it does other starches and sugars. White flour is really nothing more than a refined carbohydrate. It is a great contrast to its Whole Wheat counterpart which is processed by the body in a completely different way. 

Whole Wheat flour is absorbed by the body as a grain. It is used for energy and processed slowly by your body.

Enriched Flour is basically a healthy grain striped down to a starch and 'enriched' with some of the vitamins and minerals removed in the processing. 
 This enriching and bleaching process is esentially why bread is now 'bad'. This bleaching process took a nutrutuous food which sustained life of all kinds and turned it into a literal killer. This 'Daily Starch' sends out bodies through a roller coaster of sugar highs and lows and leads to diabeties, obesidy, heart disease and a whole host of other health problems.

Our daily bread had been turned into our daily starch!!

But, the good news is, flour is NOT bad! Whole Wheat and sprouted flours are an important part of a healthy diet. With Shelf Reliance your can store whole kernels of wheat and grind it to make your own healthy flour!!  


Chose Whole Wheat when ever possible... And think of white flour not as a grain, but as the starch/sugar it is once processed by your body.

Reclaim your daily bread!

It's easy to keep up with the great sales and recipes! Just subscribe to stay up to date!

Thursday, June 23, 2011

What is TVP?

by Hilary at The Thrive Hive


Many people are curious about what TVP is. TVP stands for texturized vegetable protein. It is an alternative to meat that provides excellent protein, is economical, and is easy to store and use. TVP provides the protein of meat without the fat or the mess that cooking and browning can create. The most popular TVP product is TVP Tacos. In fact many popular fast food chains use this in their recipes as a meat extender. You can make a quick meal, such as tacos, using TVP in 15 minutes for much less than the cost of ground beef and with more nutrition. In our family we also love to use TVP Ham or TVP Bacon on salads and baked potatoes to add flavor and crunch without adding calories. TVP does not last as long as freeze dried meat, but I like to have it in my home store because it costs less and if the needs arises for me to live off of my food storage I will be able to extend the freeze dried meat I do have or use it on it's own and feel confident that my family is getting good nutrition. TVP is also very convenient for camping as it weighs very little and can be quickly rehydrated or added to dishes.
TVP is made from soy flour where the soy oil has been extracted. It is cooked under pressure and then extruded and dried. Not only is TVP high in protein, but its also high in fiber and low in fat. This makes TVP ideal for food storage and also for every day use. Because TVP is not made from meat, it does not have the contamination risk that many meats have with bacteria such as E. Coli and Salmonella. Because it is soy based, it is perfect for those on a vegetarian diet.
To reconstitute TVP, pour ¾ cup boiling water over 1 cup TVP and let stand for 5-10 minutes. It can also be added dry to dishes with adequate liquid such as soups or spaghetti sauce. The texture of TVP can be adjusted by the amount of liquid added, so you can experiment to find out just how you like it. 1 oz of TVP is equivalent to approximately 3 oz of meat. After rehydration, TVP should be treated like meat and must be refrigerated and eaten within a few days.
(TVP facts taken from shelfreliance.com)

Here is a great TVP Taco recipe from Tawny:

5 Minute Taco Night
You Will Need:
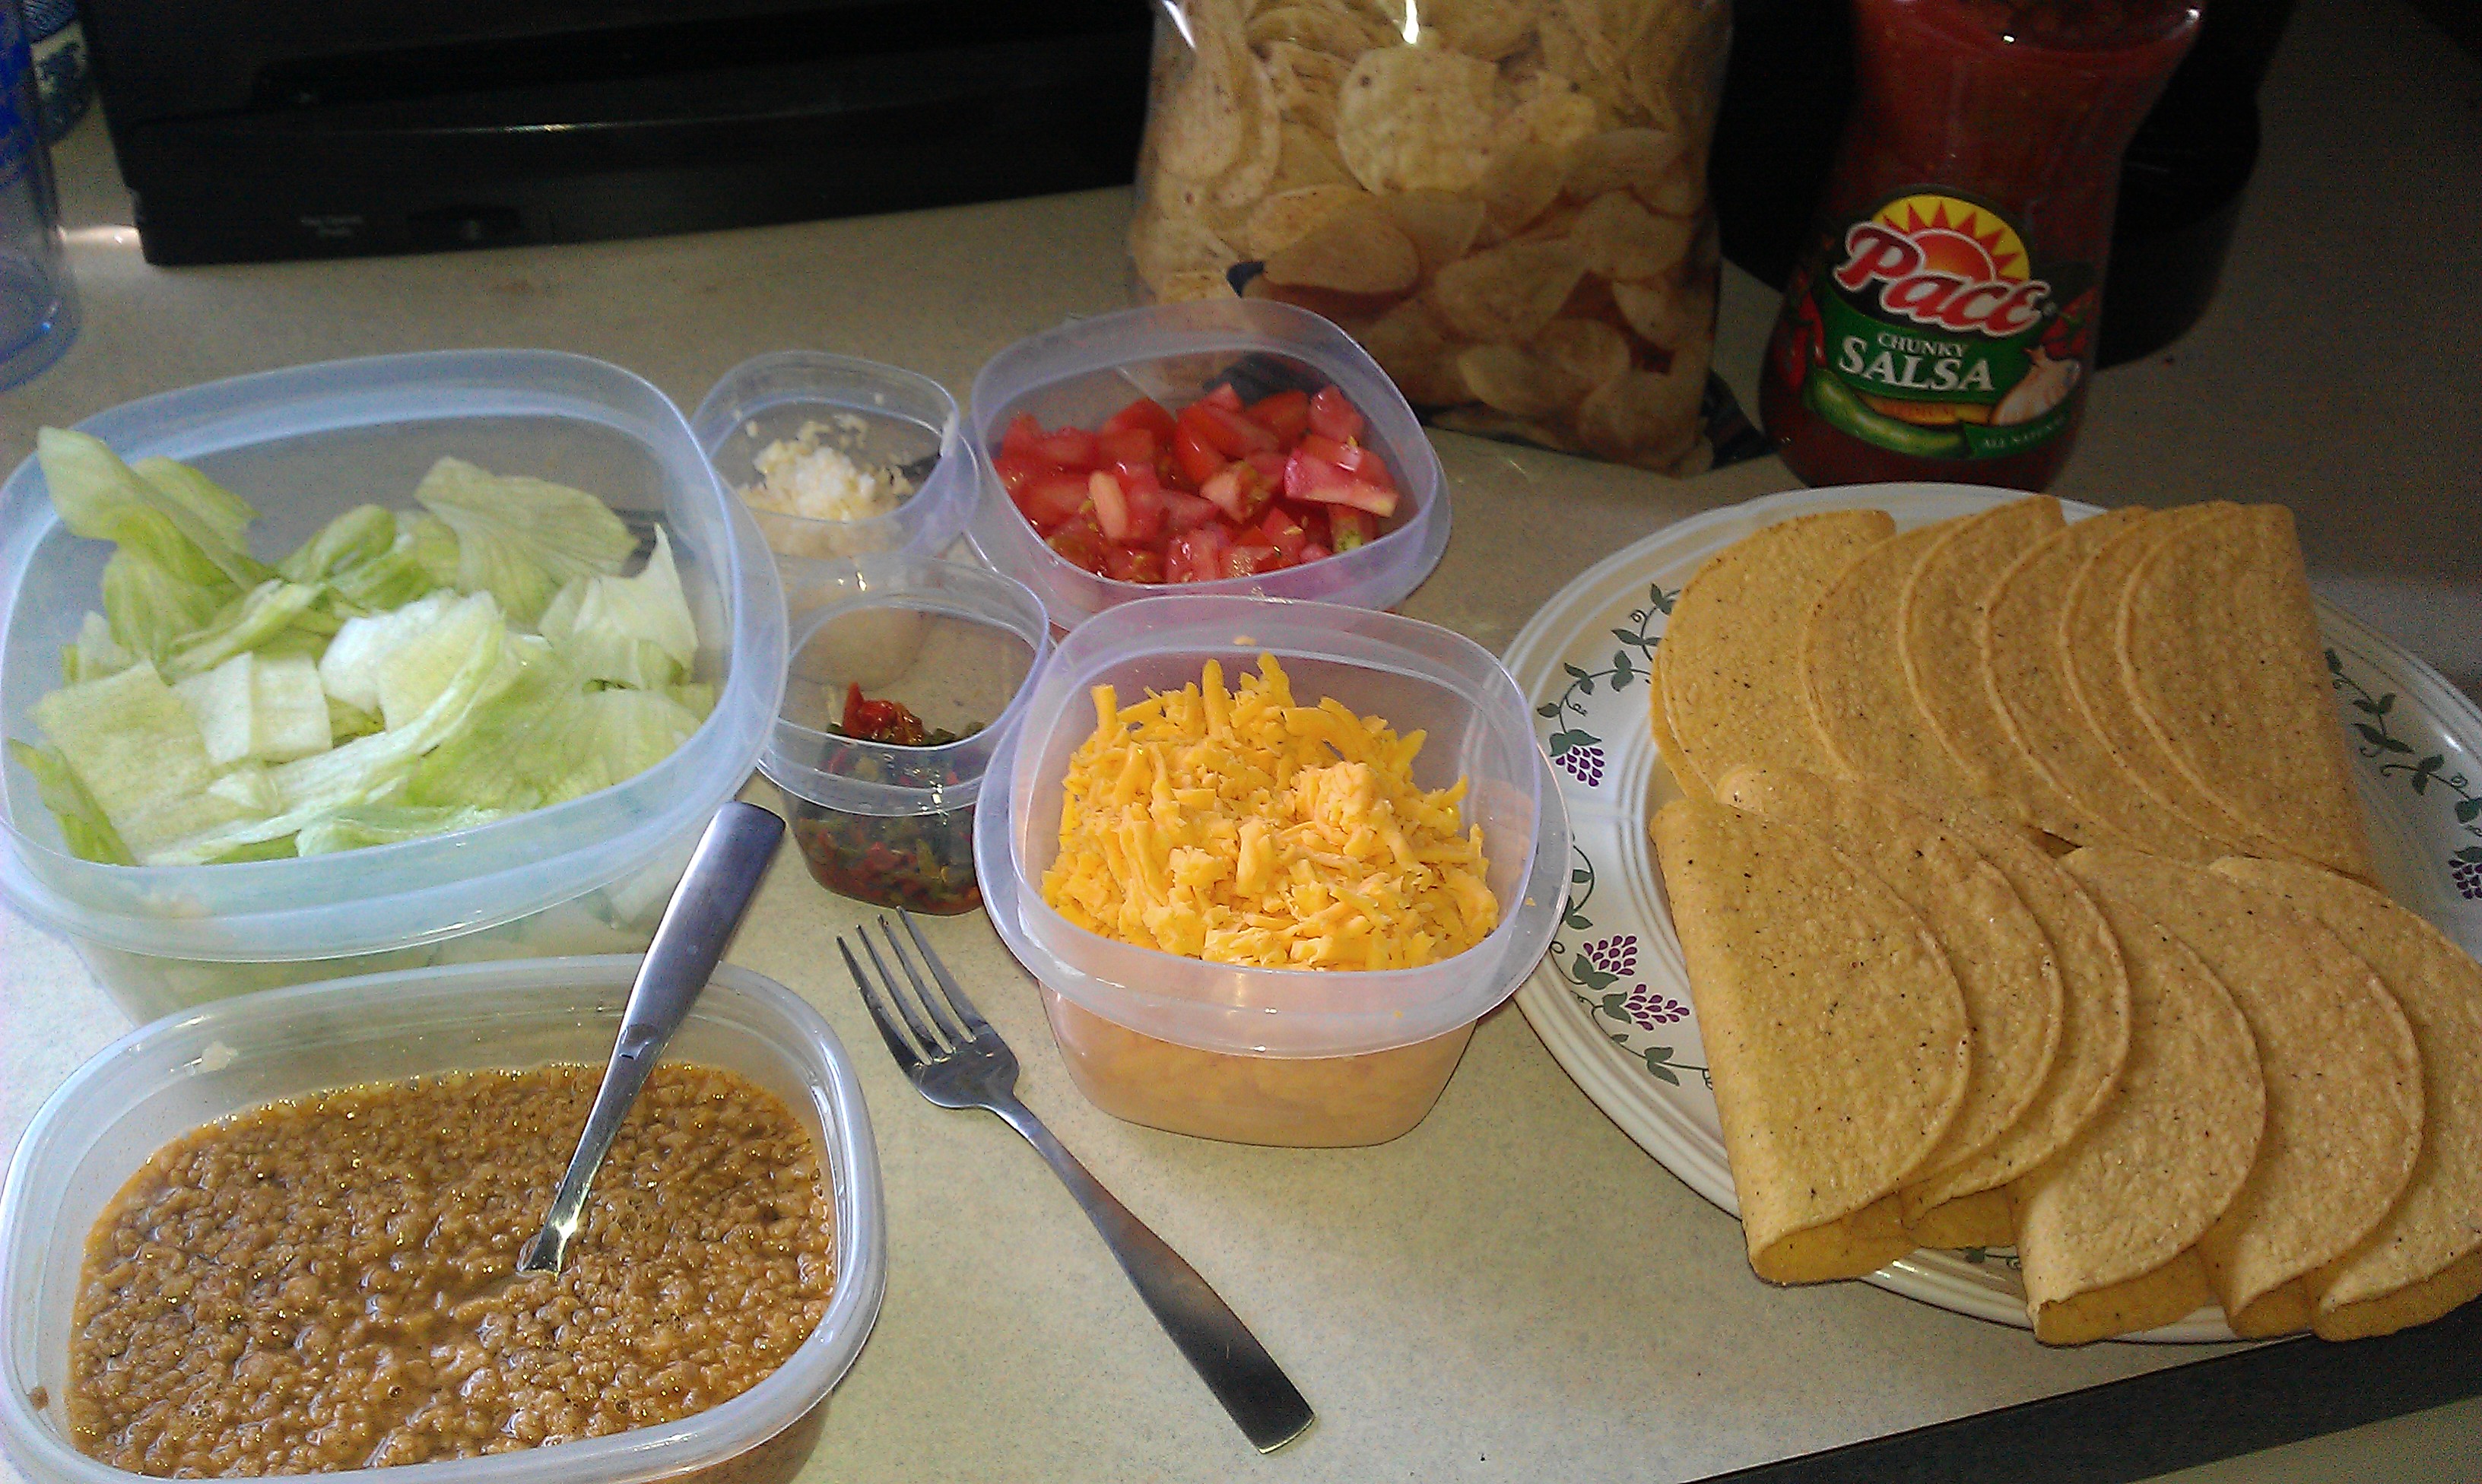
*Thrive Taco TVP *Lettuce *Salsa
*Thrive onions *Tomatoes *Corn chips
*Thrive Peppers *Cheese *Tortillas

Directions:
1.Reconstitute enough TVP for your family’s needs. Remember the TVP almost doubles when reconstituted. For example, if you need 1 cup of TVP, reconstitute half a cup. I reconstitute my TVP by covering it in HOT water and letting it sit. I drain off any excess water. 2. Reconstitute onions and peppers to meet you family’s needs. Again, cover with water, let sit, and drain excess water.

3. While your other ingredients are reconstituting, warm your tortillas in the over.
I warm mine at 300F for 5 min.
4. Again while other ingredients are reconstituting, chop lettuce and tomatoes.
5. I keep grated cheese in my fridge, but if you don’t, now is a great time to grate that cheese. You could also reconstitute some yummy Thrive freeze dried cheese.
6. Open your chips and salsa.
7. Serve
I serve this ‘buffet style’ and let everyone make his or her own plate. Some make Taco Salad with a salsa dressing, some have tacos, some have nachos, and some have a combination of them all! It is a real crowd pleaser!
This is also GREAT served with Beans! Yummy!!
Who doesn’t love a crowd pleaser that is healthy and can be prepared in less time than it takes to order at a fast food restaurant?

It's easy to keep up with the great sales and recipes! Just subscribe to stay up to date!

Wednesday, June 22, 2011

Granola Bars

I LOVE Granola made with THRIVE!!  A consultant friend posted this recipe for Granola Bars that I just love.  It is sooo easy to just substitue THRIVE in any recipe, like this one.  Give it a try!

Granola Bars 

By Jamie Templar

A few days ago my sister who has helped me with the design of my blog sent me a txt asking when I changed my blog.  I had no idea what she was talking about as I had not changed anything on it.  After a minute she realized she was at the wrong blog.  She went to self reliance by Jamie. I can see how she would get that confused with mine.  We have the same name and I sell Shelf reliance products.  Anyways I asked her to send me the link to the blog so I could take a look.  I was very impressed with what I was seeing.  I looked through her blog and found some yummy sounding recipes and great info.  I love a good food storage/emergency preparedness blog and another I have found. I am all about making homemade when I can.  I have been trying for about a year now to find a good granola bar recipe.  I have tried several different recipes and they have all tasted good. BUT when I go to cut them into bars they either crumble or fall apart when I pick them up.  My other problem is I compare them to store bought granola bars.  With these I need to remember that the homemade bars are not going to be like the store bought bars.  Anyways Jamie at self reliance by Jamie  about a year ago posted a recipe for granola bars.  They looked and sounded good so I tried her recipe yesterday.  Oh my goodness....I found my granola bar recipe.  Thanks Jamie!  These not only taste good but I was able to cut them into bars and they held up!!! Granola Bars
4 1/2 c rolled oats (regular, not quick)
1 c flour ( I like to use whole wheat flour)
1 tsp baking soda
1 tsp vanilla
2/3 c butter, melted
1/2 c honey
1/3 c brown sugar, packed
1/2 c mini chocolate chips (raisins, craisins, other dried fruit, whatever you like!)
Combine all ingredients but the chocolate chips (or whatever you are putting in). Mix and then add the chocolate chips in and mix again. Press into a greased pan. Bake at 325 degrees for 18-22 minutes. Enjoy!!
**this is a basic recipe. . . if you like other things, try putting them in and make it your own recipe! Nuts, seeds, coconut, peanut butter. . . the options are endless!**
These are NOT my pics, they are Jamie`s.  To see her blog for this recipe click here.

Monday, June 20, 2011

Recipe: Homemade 'Helper' Recipe

We love easy around here. And we have all been brain washed into believing those boxed ‘helper’ recipes are as easy as it gets.
With a whopping 110 Calories in the mix alone and a lengthy list of unhealthy ingredients and preservative, there must be a better way!
Making homemade hamburger helper could not be easier!! You make up a basic ‘mix’ and add noodles and meat as you see fit. You could easily layer noodles, mix and spice into mason jars to give as gifts or as a quick meal. With options such as freeze dried meats or TVP, quick ‘helper’ style meals have never been easier!!
Homemade ‘Helper’ Mix
  • 1 1/4 tsp. black pepper
  • 1 Tbs. garlic powder
  • 2 Tbs. dried parsley
  • 1/3 cup Thrive Freeze Dried Onion
  • 1 Tbs. salt
  • 1 2/3 cup Thrive Powdered milk
  • 3 1/2 Tbs. Thrive beef bouillon
Mix this all up and store in a glass jar or other sealed container.
Use 1/2 cup for each pound of ground meat.
The Nutrition Info for this basic mix comes to about the following: 41 Calories, less than 1g of fat
Basic Preparation:
  • 1 pound meat (Thrive Freeze Dried Beef, Thrive Beef TVP, or seasoned browned ground beef)
  • 1/2 cup of  ‘helper’ mix (above)
  • 1 to 2 cups noodles (elbow macaroni for example)
  • 1 1/2 to 3 cups water
Stir in meat, dry mix, then add 2 cups hot water and 2 cups noodles. You can add more or less water and noodles, proportionately, depending on much you need to stretch that pound of beef. Bring to a boil, then turn down to a simmer, cover, and cook until noodles are tender, about 20 minutes.
This Recipe is easily adaptable to what you have on hand and what you are hungry for. Looking for a cheese burger? Add Thrive Cheese Blend or Shredded Cheddar Cheese. Throw in some Bacon TVP for a bacon Cheese burger! With Thrive Freeze Dried vegetables, its easy to add corn, green beans, or other yummy veggies to your helper meal. Just dd them when you add the noodles. Looking for a comfort food: Instead of macaroni, add 2-3 cups very thinly sliced potatoes. Simmer 20-30 minutes until potatoes are tender. Uncover and simmer until liquid has evaporated.
This recipe is easily adapted to your families dietary needs. Use whole grain pasta. Or gluten Free Pasta. Season and adjust the recipe to your needs and taste.
When you do the math this recipe is an incredible money saver!! You could easily take the $2 or so it takes to buy one preboxed ‘helper’ meal and buy enough pasta to make this recipe 2-3 times! The ‘Helper’ Mix cost about $2 to make & makes about 6 servings, so this mix is going to cost you about $.30 per serving!
With this mix you are going to save time. You can easily customize it to what you have. You are going to save shelf space, all those ‘helper’ boxes take quite a bit of room. You are going to save money, preboxed foods are expensive, and you are going to save your family’s health.
Ready to start making your mix? Go to ThrivingTexasMama.com to get the very best in freeze dried and shelf stable foods. Contact me about making the most of your ‘home store’, or book a ‘make a mix’ party and share this and other great mixes with your friends while earning free products!

It's easy to keep up with the great sales and recipes! Just subscribe to stay up to date!

No More Starving College Kids

By Tawny's Thriving Home

The Freshman 15! My theory is it comes from all the junk food poor college kids are living on: Ramen noodles, Mac & Cheese, Frozen Pizza! Yuck!!
Eating healthy can seem expensive. Fresh Produce goes bad very quickly. processed food  is cheap because its full of ‘junk’.
Do you know a college student you care about? Would you like an easy, affordable way to provide this ‘starving’ college student real, healthy, easy to use, convenient, shelf stable food?
The perfect gift: The Q!
You choose the amount. Each month Real healthy food is sent to your ‘starving’ college student! You can even choose what foods to send! Does you student love milk but is short on space? Send him a #10 can of instant milk each month! Is she a cheese lover? Send her yummy real freeze dried cheeses each month? You can choose entrees, desserts, fruits, veggies, dairy, basics, meats & beans, anything you would like!
What college student wouldn’t love a monthly gift of food! How comforting would milk & brownies be each month? You will feel great knowing you are providing real food free of preservatives, with no added sugars or salts! What a great way to ensure he gets his fruits and veggies even when away from home!
College kids are short on space! Pantry cans are perfect! They can be stored just about anywhere! You can also provide your student with a consolidator or FRS shelving to help store his monthly gifts of goodies! Thrive foods require no refrigeration and have a long shelf life!
Many college kids don’t have access to a full kitchen, many shelf reliance foods can be eaten right out of the can, reconstituted, or warmed in the microwave!
When you give the Q as a gift, you get the satisfaction of providing a great gift, earn Q club reward points, and are always guaranteed the lowest price on Shelf Reliance Products!
The Q really is the gift that keeps on giving!
The Q makes the perfect gift for graduates, college students, newly weds, or anyone who eats!
Contact me today to set up a gift Q for your loved one!
What Is The Q? Learn More here.

It's easy to keep up with the great sales and recipes! Just subscribe to stay up to date!

Tuesday, June 14, 2011

Instant Powdered Milk vs. Non-Fat Powdered Milk

By Shelf Reliance Mom


For the taste, you just can't beat it.  Each can comes with approximately 5 gallons of milk making the price about $3.76 per gallon. If buying it in a case, don't forget that you get it an additional 5% cheaper bringing it to $3.57.  I know that we have cheaper milk here, but for places like CA and NY... that is tons cheaper.  But wait... what if you were to host a party and earn half off credit?  That would bring the cost of one #10 can to $1.88 per gallon or a case to $1.79.  And finally, you can't forget free credit.  Whoever said you can't get milk for free?

The freedom to never having to go to the store just to buy milk and ending up with a cart full of regrets...priceless! Email me at thrivingtexasmama@gmail.com if you'd like to learn more about hosting an online or home party.
Powdered Milk

Powdered Milk is sort of the unsung hero of all of the food storage we need.  Most people know that it is a priority in food storage, and yet it is usually the last thing people buy.  There are several reasons for this.  One being that powdered milk is much pricier than all of the other basics we need, another being that most people remember a time when they had to drink it when they were little and immediately get a sour taste in their mouth.   Thirdly, some people don’t feel like they could rotate through it fast enough, so they feel it is a waste of money.  Let me tell you that powdered milk has come a LONG way and there are so many varieties that most people can find something that they can tolerate.  Even if you are not ready for dry milk to become a part of your everyday drink of choice, there are still plenty of ways you can use this great ingredient to beef up some of your old recipes or to fabricate other canned foods you used to buy at the store for a much cheaper and healthier alternative.  Also, if you are using a little dry milk in everyday cooking, you should be able to rotate through it fast enough.  Powdered milk is still good even past the expiration, it just tends to develop an off taste.  If this is the case, save it just for cooking and it will continue to add great texture and flavor to your cooking without being noticeable.
First, let’s talk about the different varieties on the market.

Regular non-fat dry milk is the type most people are familiar with.  This milk must be added to warm water in order to dissolve well and for best flavor should be refrigerated overnight.  Most would agree that it taste’s more like milk when doctored with a couple teaspoons of sugar and a couple drops of vanilla.

Instant milk is the regular dry milk that tastes closer to the milk we buy from the grocery store.  It usually looks more like clumps and is able to dissolve in hot or cold water.  It is generally more expensive than the non-fat varieties, but is better suited for times when you would need to bring milk with you on the go.  Due to its texture, it generally takes about double the amount of powder to equal the equivalent amount of milk.

Moo’s Milk is not actually milk, but is a whey-based protein with other ingredients used to taste like milk.  It is a great option for people who are lactose intolerant who still need a milk replacement for food storage.  I have heard it referred to as the “Tang” of milks because although it has calcium and some vitamins, it is less complete nutritionally then other powdered milks.

The great thing about powdered milk is that it provides a large variety of things we have in our regular diets which we would have a difficult time doing with out including buttermilk, sweetened condensed milk, evaporated milk, cheese, yogurt, cream cheese, cottage cheese, ricotta cheese, whipped cream… you get the picture.  So, if you like one or more of the proceeding items, you might want to consider getting some milk in your “Home Store”.

Powdered milk will become more than just a comfort food if we ever had to solely rely on food storage as you think about all of the calcium it provides for strong healthy bones in growing children and adults as well as a much more flavorful option than water in recipes.

Basic powdered milk conversions:
To Make:   You need
Water
Instant Milk
Non-Instant
¼ cup
¼ cup
1-½ T
¾ T
½ cup
½ cup
3 T
1 ½ T
1 cup
1 cup
1/3 c
3T
1 quart
1 quart
1-1/3 c
1/3 c
1 pint
1 pint
2-2/3 c
1-1/3 c
1 gallon
1 gallon
5-1/3 c
2-2/3 c


To Make:   You need
Water
THRIVE Instant Milk
¼ cup
¼ cup
1/2 T
½ cup
½ cup
1 T
1 cup
1 cup
2 T
1 quart
1 quart
1/2 C- 3/4C
1 pint
1 pint
1 C - 1.5 C
1 gallon
1 gallon
2 C - 2.5 C


In most cases (like for baking bread) double the amount of powder for instant milk. NOTE: If using THRIVE milk, go by the directions on the can. What does this mean?  THRIVE gives you more in a #10 can of instant milk than most would!!!  I left variance in it because I know that some people like it stronger, but it is great with the lower amount.

When I taught a powdered milk class, hands down the THRIVE won 1st place.  I get people who drink it at my house all of the time who didn't realize it was "fake milk" or whatever haters like to call it ;)  We also sell a milk alternative we call powdered milk as well as a chocolate drink mix!


Now for the recipes!

Buttermilk aka Sour Milk

In recipes that call for buttermilk you simply need to put a teaspoon of either lemon juice or vinegar in the bowl, then add water and powdered milk.  Let it stand for 5 minutes as the acid creates the chemical reaction, then use as needed.

Evaporated Milk

1-1/2  C Water
1/2  C + 1 T non fat dry powdered milk

Blend very well in a blender. 

Evaporated Milk was created back in the 1920′s and 30's as a way to replace expensive cream and whole milk in recipes. It is whole milk with more than half the water removed before it is homogenized. Alot of women in this early time period fed this to thier babies instead of breast milk.  (Do not do this, just giving you a little tid bit if history;) ) DO NOT USE IT AS A SUBSTITUTE FOR SWEETENED CONDENSED MILK. However, you can use it to substitute for half and half. Isn’t that great?! I know I don’t keep half and half stocked in my fridge. Use Evaporated Milk, made from your food storage, in any recipe by doubling the amount of the dry powdered milk and leaving the water the same. As a good rule of thumb to go by, for normal milk made from your powdered milk it is 3 T. dry powdered milk per 1 C. water and don’t forget there are 16 T. in a cup.

Sweetened Condensed Milk

½ c hot water              2T melted margarine or butter
1 c sugar                       1 c non fat dry powdered milk

Mix all ingredients in a blender or food processor. If lacking electricity you can boil the water beforehand and mix quickly with a whisk but it will not be as smooth.  Mix on high for one full minute. The mixture will be kind of thin, but will thicken up after standing for about an hour. This recipe makes about 1 ½ cups, or the equivalent of one can of condensed milk. This mixture stores in the fridge for a week, or for longer storage, freeze it for a few months, and then just thaw before using. The cans of SCM cost about $1.50 in the store so this is a great deal with very little effort involved in the process! Sweetened condensed milk was actually started back in Civil War times as a way for soldiers to have milk that wouldn’t go bad.

It's easy to keep up with the great sales and recipes! Just subscribe to stay up to date!